How To Make a VPN: Exploring Various Ways of Hosting Your Own VPN Server
DataProt is supported by its audience. When you buy through links on our site, we may earn a commission. This, however, does not influence the evaluations in our reviews. Learn More.
Going online via a virtual private network is an important security habit. Privacy issues abound, especially with internet service providers having more insight into our browsing habits and online activities than ever before. With additional layers of privacy that VPNs provide by establishing a safe and encrypted connection, we can avoid having our information used as a trade commodity without our permission.
But did you know that, besides using a recommended VPN service provider, there are also ways of creating your servers? In this article, we’ll go through several methods that’ll detail how to make a VPN at home.
Benefits of Running a VPN for Yourself
At this point, you may be wondering what the point of setting up a do-it-yourself VPN is when you can easily find trusted VPN providers online. Here are some reasons learning how to make a free VPN server might be worth it.
- Increased privacy. With VPN providers, your internet traffic goes through a secure and encrypted tunnel. However, there are points in communication where your data goes through the service provider and their servers, which they may rent from another party. If you use your own server, the information stays between you and the server provider or safe with you if you’ve set up a dedicated server. Fewer points of trust that can fail translate to a more secure connection.
- Remote access to your network. If you use a router you’ve set up with a home server, you’ll be able to use your internet connection anywhere. Besides accessing network-attached storage, you’ll be able to access printers and computers connected to your home network. Another advantage is that you’ll be able to use geolocked services like Netflix remotely and see the content you have access to from home.
- Potentially low setup costs. Even though some providers like Atlas VPN offer a free plan with unlimited speeds and data, most will require you to hop on a premium plan to access the complete scope of features. Depending on the hardware you use for your home VPN server, you may need to get your hands on a router with support for VPN servers or a router with firmware support for DD-WRT, OpenWRT, or Tomato. Otherwise, it won’t cost you anything extra, except the time required to set it up.
- Opportunity to learn more about VPNs. Learning how to make your own VPN will help you understand the concepts behind the technology better and learn the basics of virtual private networks. Furthermore, in the process, you might learn enough to make an informed decision about what type of VPN would be the best for you.
Disadvantages of DIY VPNs
If you’re not particularly tech-savvy, you shouldn’t set up a VPN for yourself. You may leave out critical settings that’ll prevent the software from establishing a secure connection. Furthermore, if you improperly flash your router, you risk “bricking” the device (damaging it beyond repair). There are other downsides, too.
- No access to region-locked content. While having a free home VPN sounds intriguing, many will be disappointed to know that you still won’t be able to access content meant for other countries. Your virtual private network will have a single IP address available to you, which will be the one from your server.
- Download/upload speed degradation. If you already have a lackluster internet connection, using a VPN will just slow it down even more. With slower download speeds, you may even have performance issues with streamed video content, and therefore, another solution may be preferable, such as VPN services optimized for gaming.
- Setup time. Properly installing the required software takes time. You may have to connect a new router or flash the current one to support a VPN server. Furthermore, any software you install will have to be configured manually, so it’ll involve a bit of technical know-how to get it running. In comparison, most paid VPNs work “out of the box.”
- Updating software is your responsibility. VPN software updates eliminate any vulnerabilities that malicious parties might exploit in your secure connection. While VPN services seamlessly update their software on their end and roll it out to their users without requiring a single extra step on your part, with DIY VPN solutions, the task of regularly updating the software will fall on you.
- Risk moved to the server host, not eliminated. Creating a VPN connection through a cloud server hosting service will effectively change the IP address from which you’re accessing the internet to your server’s IP address. Most VPN service providers operate on that principle, but they have the advantage of having a comprehensive server infrastructure. Otherwise, if you’d like to change the IP address from your existing server, you’d have to have another one set up with a VPN server. With companies offering limited free cloud servers, you could potentially install a VPN server on it at no cost. However, there’s no guarantee that the cloud hosting service isn’t monetizing your data, especially if it’s offering a free service. With moving away from your ISP and VPN provider, you’ve just moved the risk to a cloud server host.
Setting Up a VPN Server
We’ll now explain how to create a VPN without subscribing to a VPN service. We’ll present several methods so afterward, you can pick the most convenient option for you and decide if the hardware and server investment is cheaper than opting for an affordable VPN provider that unlocks Netflix or not.
How To Make a VPN on Windows 10 Server Without Additional Software
Windows 10 has an integrated feature to act as a VPN server. However, the operating system relies on the point-to-point tunneling protocol, which is nowadays considered obsolete. More advanced protocols, like WireGuard and OpenVPN, provide much tighter security and are more reliable.
Here are a few things to consider when setting up Windows 10’s in-built VPN:
- You’ll need to enable forward ports on your router.
- You’ll effectively allow access to and from your computer through a dedicated port for PPTP, making it a potential vulnerability or a point of entry to your PC. Using a strong password and a port that’s less commonly used are just some of the steps you can take to maintain your PC’s security.
- If you are looking for remote access to your home PC, better and ready solutions with free plans are available.
Creating a Server for the VPN
First, you need to open the “Network Connections” window, which you can quickly access if you search for “ncpa.cpl.” This will lead you to Network Settings within Windows’ Control Panel.

When you open the Network Connections window, it’ll look similar to the screenshot below.

To access the toolbar, press the “Alt” key on your keyboard. Then go to the File dropdown menu and click on New Incoming Connection.

Windows will prompt you to choose which user accounts you’ll allow connecting remotely. It may be a good precaution to use a guest account or create a new one when configuring a VPN for remote logins. Whatever you decide, it’s still essential to create a secure password.

The next page will let you choose to allow VPN access through the internet.

You need to choose networking software that you’ll enable for incoming VPN connections. If you don’t need to access shared files and printers, it’s advisable to deselect the option. You can allow access and finish setting up the VPN once you’ve made your selection.

By following these instructions, you’ve created a VPN with a PPTP connection with your Windows 10 PC acting as a server. You can always return to Network Connections and remove the VPN connection or edit the settings.
This is a rudimentary setup if you need VPN access to your computer. It’ll involve setting up port forwarding on your router through its setup page. You need to enter your router’s local IP (most often 192.168.0.1) and enable forward port 1723 with the Windows 10 VPN server’s public address.
Besides remotely accessing content via your home server, this setup won’t be enough for most demanding VPN users. Even free Chrome VPN extensions will better obfuscate your data while browsing than this setup, as you’ll still be identifiable online through your server’s public IP.
How To Make a VPN Connection With a Router
So, how do you go about making your VPN server that won’t use your IP address? Well, you can install a VPN protocol on a VPS hosting service and connect through a client you’ve set up at your home.
First, decide what hosting provider you’d like to have as your VPN host. Keep in mind that the distance between you and the virtual private server will directly impact the latency between you and the server. Another determining factor will be what kind of bandwidth you can find for an affordable price. If you expect to have a lot of P2P traffic, it might be more affordable for you to sign up with a VPN provider with dedicated torrenting servers.
However, if you’d still like to try, there are several options on how to make a VPN tunnel with a cloud server.
Purchasing a VPN Router
One of the most straightforward methods to create a VPN at home is to purchase a router that supports VPN server features. However, a new router may cost you more than subscribing to a VPN service for several years – anywhere between $50 and $300.
Before deciding on a router model, check if it supports the VPN protocol you intend to use. The most commonly used and recommended protocol is OpenVPN, as it has the best balance between performance and security.
To set up the router, fire up your browser of choice to enter the Settings menu. You can do so by entering either 192.168.0.1 or 192.168.1.1 IP addresses. Most manufacturers use this local IP to access their routers, but if it isn’t working for you, visit the official website of your router’s manufacturer and download the instructions manual.
After the settings page loads, you’ll see the login screen prompting you to enter the username and password. Most often, both will be “admin” or just blank. If this isn’t working, consult the router’s manual.
VPN settings are usually located in the Advanced Settings part of your router. Most VPN routers will have multiple protocols, but we recommend you stick to OpenVPN.
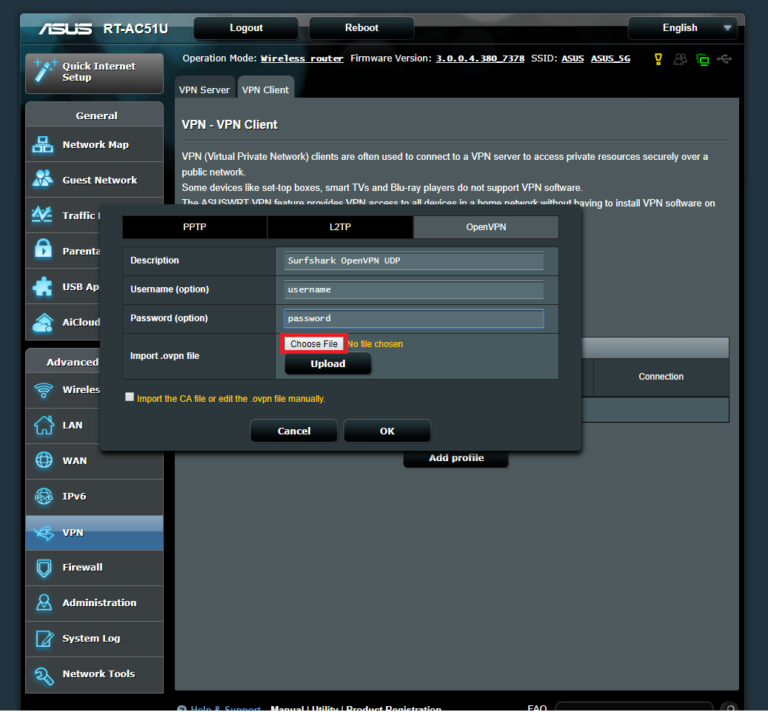
As you can see in our example above, these are the settings options for the Asus RT-AC51U router and the OpenVPN protocol, specifically for SurfShark’s VPN. To enable OpenVPN and have your router go through either a VPN you’ve set up or through the server of a VPN provider, you’ll need to enter your username and password and import an .ovpn file.
This file holds the information your router will need to access the VPN server. By setting it up in such a way, you’ll ensure that any device connected to your home network will automatically access the internet through a VPN.
Flashing Router’s Firmware
Another option is to use your existing router and replace its firmware with DD-WRT, Tomato, or OpenWRT and have it support the creation of VPN servers or use it as a contact point with your hosted VPN.
It’s important to note that this method is for advanced users only and may permanently damage your router and even void your warranty. It also takes time to properly set up and do comprehensive research to see if your router is supported and if creating a VPN connection with this method is worth your time and investment.
Since the process has a lot of room for error, it may still miss the mark and leave you vulnerable to security and privacy leaks. If you are just looking for a way to use your Mac with a VPN, finding a service provider that supports macOS is a much better option.
If you still wish to give it a try, here’s how you can flash your router.
- Depending on the firmware you want to use, visit its official website and check if the router you want to flash is supported.
- Download the latest stable firmware build.
- To flash the firmware, you need to connect the router to your computer via ethernet cable, turn it on, and plug it into a UPS because, in case of a power outage during the firmware upgrade process, the device would most likely be damaged beyond repair. Therefore, having a UPS is a convenient safety precaution.
- Access the router’s menu via 192.168.1.1 or 192.168.0.1 IP address through your web browser.
- After logging in with your credentials, locate the upgrade or update option within router settings.
- Each supported router has specific instructions you’ll find on the firmware provider’s webpage. Follow these closely as you can’t easily reverse any mistakes made in the process.
- After the update is over, restart the router and log in again.
OpenWRT, Tomato, and DD-WRT have detailed instructions on how to proceed next, and configuring VPNs in this manner will require you to set up a few more things.
For your VPN clients to have access to the VPN server, you need to change router firewall settings to permit inbound connections through VPN ports.
Installing and setting up OpenVPN is comprehensively covered on that protocol’s official website.
To create an encrypted communication tunnel, you need to generate a certificate authority, allowing a secure server-client connection. Furthermore, you need to generate a server-side private key and certificate pair for each device you plan to connect to the VPN.
With that out of the way, just extract and add client profiles to each device, and then you can connect to the VPN server.
As in our previous example for a VPN router, you can also set it up as a client for a remote VPN server. As you can see, creating a VPN connection can be a complicated process when you need to handle every part of the setup.
How To Make a Raspberry Pi VPN
Raspberry Pis are small and versatile computers (about the size of a credit card) that can be plugged into standard computer monitors and TVs and even receive input from a keyboard and mouse. They are also great tools to learn programming and how computing works.
By installing PiVPN on a Raspberry Pi, you get an external device that’ll support multiple devices connected to the VPN. Even though the Raspberry Pi is used as a learning tool, it’s meant for people with a background in IT and programming, and it’s therefore pretty complex for the average user.
Therefore, the easiest way to go about installing a VPN on one is to use a PiVPN install script. You can set up the device to use OpenVPN or WireGuard, and you need to set up everything from your DNS server and VPN ports to 512-bit encryption keys.
Since Raspberry Pis are highly customizable, you’ll need a micro SD card and an ethernet cord connection. The process is described in detail on the PiVPN Project website, and if you are enthusiastic and curious about the process, we recommend checking it out.
Creating a Cloud-Based VPN with Algo VPN
Another interesting option for those who want to set up and run a VPN is to install open-source software like Algo VPN on a cloud server. Renting a cloud server from a reputable cloud platform such as AWS will allow you to access content that’s limited to the country your server is in.
We’ve already mentioned privacy concerns with these types of cloud hosting services, especially those that offer free plans. However, if you’d still like to try it out, note that it may require some coding skills.
We’ll assume that you have a server where you can set up Algo VPN. We’ll cover some of the steps required to create a default installation of the software on both the server and client sides.
Algo VPN is installed via command prompt or terminal, depending on whether you use Windows, Linux, or macOS. Furthermore, it requires having Python 3.6 or newer installed on your computer along with the needed supporting packages. Detailed instructions on how to deploy the Algo Server and configure VPN clients can be found on the Algo VPN GitHub page.
Alternatively, you can save a lot of time if you install a VPN from a reputable provider like ExpressVPN.
Conclusion
Should you even bother with setting up a home VPN server?
The answer is – it depends.
If you travel often and need to access your home PC workstation to use that computer’s resources or access files, there are benefits to having a VPN server. Having an encrypted tunnel as a line of communication is much better than having unsecured access that’s potentially open to malicious parties.
Are there benefits to establishing a VPN on your router? Yes, but there are considerable downsides, too. On the plus side, there’s no need to set up a separate VPN for your Android and iOS smartphones or any other device that needs internet access. All your devices will go automatically through your router’s VPN when connected to your home Wi-Fi. This is convenient for users who employ a router as a server or a VPN client.
However, sometimes you’ll need a faster online connection and access to sites that don’t allow VPNs. In such cases, you’d have to disconnect from the Wi-Fi with VPN and use an unprotected router or disable it manually from the router’s VPN settings menu. VPN service providers allow for easy VPN setup through their apps, so you can easily turn the service on or off without having to invest in a second router.
Investing in a cloud server and setting up a VPN just to access streaming platforms is likely more expensive than just paying for a subscription with a trustworthy VPN company. Cloud servers have limited bandwidth, while a small fee and a VPN app can give you access to myriad servers worldwide. Besides, you’ll need technical know-how to make a VPN on a Linux or other type of server.
Of course, your reasons for setting up your own VPN don’t have to be entirely practical. Learning how to make a VPN on your own is also a great opportunity to find out more about internet security.