Streaming as a Career – How To Start Streaming on Twitch
DataProt is supported by its audience. When you buy through links on our site, we may earn a commission. This, however, does not influence the evaluations in our reviews. Learn More.
All of us dreamed, at one point or another, about quitting our jobs and earning money by doing something we love, like gaming. Twitch is built around that idea. Still, that doesn’t mean anyone can just sleep until late, play games all day, and rake in enough money to support themselves comfortably. It takes a lot of work to become a successful streamer – here’s how it begins.
How To Stream on Twitch and Why
Twitch is the biggest and fastest-growing live streaming platform out there. It’s the place to be for video game streaming content, but it’s not limited only to gaming. Whatever you want to stream or watch, you can find a category for it.
It’s easy to start streaming on Twitch: All you need is a Twitch account, good internet connection, and solid hardware. Creating an account is straightforward and won’t cost you anything, either. On the other hand, decent equipment may be a bit hard to come by now with the GPU and CPU scarcity but hopefully will see the end of it soon.
How To Create a Twitch Account
You can watch Twitch without an account, but you need one if you want to interact with the streamer or start streaming on Twitch yourself. As mentioned before, creating a Twitch account is a straightforward process.
It all starts with the “Sign Up” button on Twitch, and if you plan to stream, you have to enable two-factor authentication (2FA) on the account. This feature can be found in the account settings under the Security tab. The process is simple and free of charge, whether you are just a viewer or plan to stream. The only other account barrier is age.

2FA setting location
How Old Do You Have To Be To Stream on Twitch?
Anyone under 13 can’t have a Twitch account and therefore can’t stream. Minors over the age of 13 may only use Twitch under their parents’ or legal guardian’s supervision, be it for viewing or streaming.
Internet Connection
Think of your hardware like a car that runs on bandwidth instead of gasoline. You won’t be going anywhere without enough bandwidth, no matter how good your hardware is. The requirements will vary depending on the encoder and type of content.
Twitch offers a helpful guide to get you started. For setting up a Twitch stream with basic 720p resolution and 30 FPS for framerate, the recommended speed is 3000 kbps (just below 3 Mbps). Because speed can fluctuate, you want a buffer of around 30% to 40%, putting the required speed around 4.1 Mbps. For better quality, you’ll need a better internet connection.
Hardware
Whether streaming on a console, PC, or smartphone, your hardware will be the central part of your streamer setup.
PCs dominate this scene and are required for high-end Twitch streaming, since consoles usually can’t match their capability and versatility. The central processing unit (CPU) is an essential part of your rig because it’s used for encoding, gaming, or any other activity. The better the processor, the better your performance will be, and PC processors are more easily upgraded than those in consoles.
When it comes to the graphics processing unit (GPU), the best one for streaming would be one with a built-in hardware encoder to lend the CPU a hand. You can also set two computers to work together: One for gaming and another for encoding and streaming.
This part may seem scary, especially with GPU and CPU prices skyrocketing as they have been for a while now, but you can start small and expand later. Quality gear will give you better content, but you still have to provide the core entertainment, which isn’t entirely dependent on your setup.
There isn’t much to be said when it comes to consoles and smartphones. They are easier to set and to Twitch stream from but are also limiting when it comes to upgrading. In most cases, you either need to buy a new device to attain better specifications, or connect it to a PC. We’ll cover them in the article as well.
Software
We covered the hardware basics, and mentioned encoding – that’s where software comes in. We recommend starting with a software encoder and only getting a hardware one when you are well on your path to fame. Here are some software encoder recommendations for starting off:
- OBS Studio is the most popular choice for streaming on Twitch. It’s free and offers cross-platform compatibility, but the learning curve can be steep. Luckily, because it’s one of the most commonly used software encoders, you can find plenty of online guides for it.
- Streamlabs Desktop (formerly known as Streamlabs OBS) offers features that increase your channel’s engagement on top of encoding.
- Lightstream Studio is a powerful and intuitive cloud-based encoder you can use within your browser, which is extremely useful for people streaming from their consoles.
- Twitch Studio can be set up fast and easy, and it’s great if you just want to try and see if streaming is for you.
- XSplit is good if you are looking for 4K 60 fps simultaneous streaming across multiple platforms. This does sound fantastic at first, but Twitch doesn’t have 4K resolutions, and once you reach affiliate level, your content has to be Twitch-exclusive for the first 24 hours. On top of it, the app has free and paid versions, and you need to use the paid version to unlock all the features.
- vMix is to be considered if you become a Twitch celebrity: It comes in five editions, ranging from Basic to Pro, and the price ranges from free to $1,200. You can also subscribe to the Max package, for $50/month.
There are other software solutions out there. Twitch has a dedicated page for recommendations. It will require some testing and fiddling to figure out what suits you best. In our examples, we’ll use OBS Studio.
How To Stream Twitch on a PC
Let’s say we have our hardware set up and a good internet connection. First, we check if everything is connected correctly and is up to date. Secondly, we need to set up our software encoder – in our case, OBS studio.
Start OBS Studio and open Settings by going to File > Settings. Find and select the output tab. Change the output mode from Simple to Advanced and consult the recommended settings from Twitch. We need to set:
- The encoder to x264
- Rate control to CBR
- Bitrate to 6,000 kbps
- Keyframe interval to 0
- CPU Usage Preset anywhere between very fast and medium
- Profile to main or high
You can also change the output resolution if you want to by checking the Rescale Output box and picking a different resolution from the drop-down menu or entering a custom resolution.

Settings for x264 1080p/60fps.
While there, we should also connect OBS with Twitch. Open OBS, select the Stream tab on the left side menu, and change the service option to Twitch. Pick the server closest to you to ensure a smooth Twitch stream experience.
To connect to Twitch, we can use the Connect Account option, which will lead us to a Twitch login page, or use a Stream key obtained from our Twitch account under Creators dashboard > Settings > Stream; then, we just paste it into OBS Studio.

Location of the Stream key on Twitch

OBS Studio Stream settings.
One of the good things about OBS Studio is that it can detect all audio sources. If OBS fails to detect them, or you have multiple devices, you can adjust them manually in the Audio section.
In the same setting window, you can find the Audio option. There we need to adjust the desktop and mic/auxiliary audio. Desktop audio is usually the default output device. We want our sound to be recorded from the desktop audio, and the mic/auxiliary is where our voice or additional sounds should be registered.
Double-check everything! You don’t want your sound breaking or coming from the wrong device while streaming on Twitch.
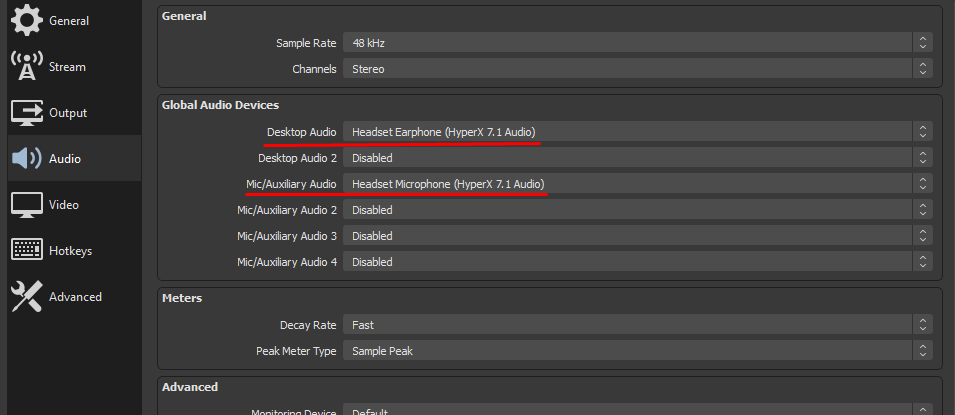
Adjusted Audio settings
Everything we want to broadcast has to have its source in OBS Studio, but first, we need to create a Scene for it. In the main window at the bottom left, we have Scenes and Sources. Click on the “+” button below the scenes to create one and call it however you want (e.g., Test).

Creating Scenes
When we have our scene, we can add a source for our streaming. In our case, we used game capture, but sometimes the game will not cooperate. When this is the case, we can use screen or window capture – pick the one that is best suited for your streaming.

Adding the stream source
Double-click on your source in the source menu and available settings to fine-tune or select the proper program or a game you want to stream.

Picking the right window for game capture
You can have multiple sources, and the top source has priority over those below it. You can have multiple images, programs, or cameras running, but you’ll have to adjust the priorities. Luckily, the OBS preview screen can show you if something is off before you start Twitch streaming.

Notice the image is on top of the game.
Now that we set everything up in OBS, we can move on to streaming.
How to Start a Stream on Twitch
Before we start streaming, we need to set up our Twitch stream title, category, and tags. Go to your Twitch profile and pick the creator’s dashboard. Under the home option, you will have “Edit your next stream info.” Click on Edit next to it.
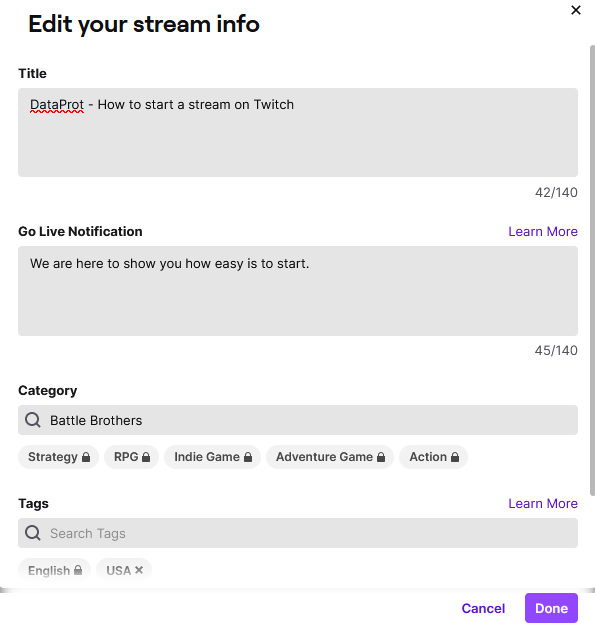
Editing stream info
Adjust the title, notifications, and everything else you want before the stream. If you need to change anything during the stream, go to your profile, pick the channel option, and click the edit button.

Edit options for changing mid-stream.
All that is left is to press the “Start Streaming” button on OBS, and you are live!
Console Streaming
As mentioned earlier, Twitch streaming from the console is easier than streaming from the PC. There isn’t any encoding software that you need to set up. You only need to connect your account, adjust a couple of things, and you are good to go.
There are ways of connecting consoles to your PC and using it to encode your video further and enhance your viewers’ experience, but it requires more gear than we would recommend for somebody just starting out. Another option is to use a cloud-based encoder for streaming, like Lightstream Studio.
How to Stream on Twitch on a PS5
As with a PC, we need to connect the PS5 to your Twitch account. Go to Settings > Users and Accounts > Link with Other Services. Follow the on-screen instructions to connect the account. Once that’s done, we need to configure broadcasting settings. We can find them under Settings > Captures and Broadcasts > Broadcasts.
There you can adjust:
- Video quality – Adjust the resolution and framerate of your stream.
- Audio – Choose whether to include the microphone and party audio as well.
- Camera – Adjust the camera position, size, and more. Bear in mind that you can only use an official SONY camera with your PS. You can find additional camera settings in Settings > Accessories > Camera.
- Overlays – Adjust where and what kind of information you want to be displayed on your screen while playing.
- Chat to Speech – Enable text-to-speech for your viewer comments to be read during the broadcast.
To start the stream, open the game you’d like to stream. Press the create button, select “Broadcast,” and pick the streaming service you’d like to broadcast through. It’ll ask you to enter the broadcast information. Select “Broadcast Options” to perform any last-minute tuning and include a camera or audio. When everything is set, select “Go Live.”
During the Twitch stream, only your game screen and audio will be shared. Your viewers can’t see anything else.
If you have any problems with your stream, turn off high-bandwidth digital copyright protection (HDCP). To do so, go to Settings > System > HDMI and toggle off “Enable HDCP.” Note that forgetting to re-enable it later is one of the common reasons streaming sites like Hulu stop working.
How To Stream Twitch on a PS4
Linking your account to a PS4 is the same as on PS5. Go to Settings > Account Management > Link with Other Services and follow the instructions. The only difference between streaming from a PS5 and PS4 is that PS4 doesn’t have a create button, so you start a stream by pressing the share button and then picking “Broadcast Gameplay.” To adjust your broadcast settings while streaming, go to the “Advanced Broadcast” menu from Options.
If you are stuck preparing to broadcast on a PS4 or PS5, check if you enabled 2FA on Twitch. You can’t stream on Twitch without 2FA being enabled.
How To Stream Twitch on an Xbox
This isn’t much different from Twitch streaming from a PS console, and as always, it starts with connecting your account to Twitch. Luckily, Microsoft decided to bring back Twitch support for Xbox X/S and Xbox One. If you have an older console, you’ll have to use a Twitch app.
Press the Xbox button on the controller, and go to Gude > Capture and Share tab. Find the “Live Streaming” option and follow the instructions to connect to your Twitch account. In the same menu, you can also see “Go Live now,” but there are a couple of things to set up beforehand.
If you didn’t already, you need to allow your camera to be used for live streaming. To enable first go to System & profile > Settings > Account > Privacy & online safety > Xbox privacy > View details & customize > Communication & multiplayer and make sure you can use video for communication. Then go to the Guide page > Capture & share > Live streaming > Camera options and set the camera to on.
Like with a PS, you can’t use just any webcam with your Xbox. You need to use a 1080p webcam that supports the YUY2 or NV12 format. Microsoft has its own camera brand that works, but you’ll need to check with the manufacturer or the store for the rest.
You have additional camera options under the Live streaming tab that allow you to set your camera’s position on screen and fine-tune it further. You can also enable and disable the microphone on the same menu if needed. Under “More options,” you can adjust game volume, microphone volume, enable or disable party audio, manage the overlay position, and manually adjust the resolution and the bitrate of your Twitch stream. Go back to the previous menu, set your stream name, and go live.
Twitch integration is relatively new, so you can expect more features as they continue to develop it further.
How to Stream on Twitch and Youtube at the Same Time
It’s easy to stream on Twitch and Youtube simultaneously, but you can only do it until you become a Twitch Affiliate. When that happens, all your content must be Twitch exclusive for the first 24 hours. You won’t be able to stream on Youtube, but you can post a video on the platform after 24 hours. Until you become a Twitch affiliate, streaming on multiple platforms to reach a larger audience is viable.
All you need is the right software, hardware, or cloud-based platform that supports multistreaming, and a good internet connection.
- Hardware encoders for multistreaming are the most reliable option, but they come with a hefty price tag.
- Software encoders can be demanding on subpar hardware, and there aren’t any good free options, but you can find affordable products, too.
- Cloud-based multistreaming platforms are helpful when you don’t have any extra hardware or bandwidth to spare because you only need to stream to that cloud, which will take care of the rest. This is extremely useful when starting out, because it requires a minimum investment.
Additional Equipment
Being a professional Twitch streamer requires a lot of work, dedication, and equipment. You will be your own production house and, just like any good production house, you’ll need to invest in special equipment to improve your production value and start earning money from Twitch streaming.
Microphone
Their voice is one of the most powerful tools in any Twitch streamer’s arsenal. It’s paramount to keep the audience engaged and be clearly understood. If your voice is garbled, they won’t stay on your channel unless you are so good at what you do that you don’t even have to talk.
Your headset’s built-in microphone will last you for a while, but a standalone microphone should be one of your first investments in your Twitch streaming career.
Camera
A basic web camera will get you going, but at one point, you’ll want to upgrade that setup with a better one or get a DSLR camera to bring the video quality of your stream up a notch. DSLR cameras are more expensive than webcams, and require a capture card, which also doesn’t come cheap.
Not all streamers like to show their face on camera, but many either do that or have an animated avatar. Unlike the microphone, you can get away without a camera, but your engagement will rely heavily on your content and voice.
Specialized Equipment
Upgrading your basic setup is always a good option, but the Twitch streaming setup doesn’t include just the PC, microphone, and camera. A good streamer is like a magician: They always have additional tricks in the bag.
- A green screen isn’t reserved only for Hollywood. Nowadays, anyone can obtain one and use it to hide or alter their background.
- Lighting can help you look like a movie star or turn your studio into a movie set. What type of light you need will depend on your streaming content.
- A stream deck is a customizable control pad that can be used for quick and easy scene changes, adjusting the volume, or changing lighting.
- Game capture cards come in two variants, internal and external. They are instrumental when you want to stream from the console but use your computer to encode the video. They are also required if you’re planning on using two PCs in a similar setup, where one is for playing, and the other is for streaming.
What To Stream
Now that you know how to stream on Twitch, the next step is to answer the most crucial question: “What to stream on Twitch?”
That is something that you’ll need to figure out on your own, but whatever you pick, try to think from your audience’s perspective. Why are they watching you? Is it because you are engaging or very good at what you are doing? What kind of content do they prefer to watch?
Ask yourself these questions from time to time, and it will help you figure out the way to go. Remember that you are just one person in the sea of people Twitch streaming. What do you have to offer, and how do you stand out in the crowd? As you can see, there is a lot more to streaming than just playing games all day long.