How To Set Up a VPN on iPhone for Free
DataProt is supported by its audience. When you buy through links on our site, we may earn a commission. This, however, does not influence the evaluations in our reviews. Learn More.
If you value your privacy and security on the internet, using a VPN is a must. A virtual private network establishes a secure and encrypted communication tunnel between your device and the content on the internet. Think of it as an additional form of defense against those who would spy on you while you’re browsing on the internet. And suppose you want to watch the latest Korean drama on Netflix, but it’s not available in your region. In that case, a VPN allows you to bypass geo-blocking technology and watch everything.
Gone are the days when installing and setting up a VPN was an exercise in frustration. Nowadays, you can learn how to set up a VPN on an iPhone for free in a few easy steps. Indeed, if you have an iPhone, the entire process couldn’t be any more straightforward. If you want to take internet security into your own hands today, read on.
Installation and Activation
There are multiple ways to set up a VPN on your iOS smartphone, and they’re pretty easy to understand and follow. You can install the VPN client app and follow the instructions. Alternatively, you can use Safari to download the VPN, or you can set up iCloud Private Relay on your device. These methods will work on iOS 8 devices or newer, including iPhones from generation 4 onwards.
Setting up a VPN on iPhone
VPN installation on iPhone 6 and newer models is straightforward, and you don’t need to put much effort into the process. To start setting up a VPN:

- Enter the specific VPN you’re looking for in the search bar, or type in “VPN” to check suggested apps.
- Select the Get option to start installing the VPN.
- Press the Open icon to activate the newly downloaded app.
- You’ll be greeted by the Login window, where you need to type in a valid username and password. If it’s your first time using the VPN, select the Create New Account/New User button to continue with the VPN setup on your iPhone.
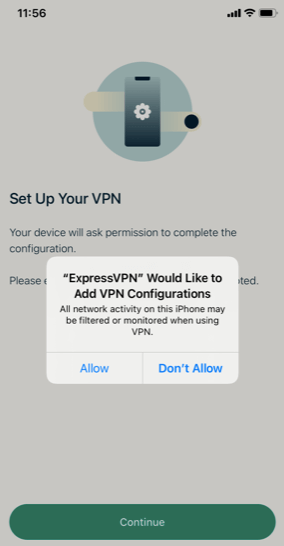
- You’ll get a popup window telling you that a VPN app wants to add configuration data. Press the Allow button to continue.
- Now you’re back to the VPN app. From here, you’ll need to select a server. Depending on the VPN app, you might have to reenter the password.
- Press the large Connect button from the VPN’s main window to launch your VPN connection.

From here, you can fiddle with the VPN options or change servers. You can also select the encryption protocol that best suits your preferences.
Setting up a VPN on an Older Version of iOS
If you have an iPhone 4 or a newer phone that uses an older version of iOS, you can set up a VPN on your iPhone via Safari and the Settings menu. It’s just as simple a process as it would be to install a VPN on more recent operating systems.
- Open Safari and use Google to find the particular VPN you want to install, or simply type in “VPN” for some useful suggestions.
- Once you open the VPN site, press the Login button to input your credentials and confirm your account or create a new account.
- Check the Account tab in preferences and locate the iPhone option to install the client app or manually complete the setup.
- If you get one or more popup notifications, press Allow to accept new VPN settings on your iPhone.
- Find the Settings icon on your smartphone and select General.
- Press the Profile button, then select VPN.
- Click on the Install icon in the upper-right corner.
- Once the installation is complete, go to Settings, then select General and VPN to set up your VPN connection.
Configure Several VPNs
If you have more than one VPN app installed on your mobile device, you can easily switch between them and select the one you want to use.
- Open the Settings icon from the home screen.
- Select the General option.
- In the Options menu, press the VPN tab for more iPhone VPN settings.
- From here, you can select which installed VPN to activate.
- Press the status switch until it goes green to start the VPN app.
Manual VPN Setup
You can manage a VPN network manually on newer and older iOS devices. This option can be handy if the VPN app you wish to install does not have iOS support or support for older operating systems. It’s more complicated, but still effective.

- Before you begin, you’ll need to have a VPN server address and login credentials ready to set up the VPN on your iPhone. You can look for this information on the VPN provider’s site or contact customer support.
- Open the Settings icon from the home screen.
- Select the General tab, then select the VPN option.
- Press the Add VPN Configuration tab, then open the Type screen.
- From here, you can select one of three VPN protocols: IKEv2, IPSec, or L2TP. Each has its pros and cons. These encryption protocols aren’t as high-tech as what you get with the latest VPN apps. Still, in case you want to select one, we’d recommend the IKEv2 protocol, as it offers a good balance between speed and security, making it a good iPhone VPN setting.
- Once you select the protocol, you’ll have to type in a configuration description, server address, account, password, and secret code (which is 12345678 for L2TP.)
- Type in a name of your choosing for your VPN connection under the Description tab.
- Under the Server tab, you’ll have to input the VPN’s server address (su305.nordvpn.com, for example.)
- Under the Account and Password tabs, type in your sign-in credentials.
- Deactivate the RSA SecurID before you continue.
- Turn on the Send All Traffic option.
- If you’re not using a VPN configuration with any proxy, you should deactivate the Proxy settings.
- Press Done and select the newly created VPN configuration, or change your VPN iPhone configuration again.
- Toggle the Status button on to connect.

Next time you want to turn off the VPN configuration, return to this tab and press the Status button again to deactivate it. You can also disable or enable any existing or installed VPN service here.

To uninstall the established VPN configuration, return to the Settings tab, and press the VPN Configuration option. Select the VPN connection and press the Delete VPN tab at the bottom of the page.
iCloud Private Relay Guide
With iOS 15, Apple introduced new and unique features and services, such as iCloud Private Relay. This is a protection option for those looking to change the VPN on their iPhone. It’s available for free to all users who pay for the iCloud+ package with storage, cloud, and sync options. Be aware that iCloud Private Relay is still in its beta version.
This feature keeps the details of your internet activity obfuscated; all your Safari browsing data goes through two relays or pit-stops. These relays encrypt your information and then forward it to Apple to hide it from your ISP once it requests browsing details.
Once it lands on Apple’s proxy server, the DNS request with the domain name is stripped away from your iPhone IP address, similar to VPN config on the iPhone. Apple keeps your IP address and only sends the encrypted DNS request to a trusted place with the false IP address and the decryption key. The false IP address is based on your relative location.
This means that Apple has one piece of the browsing puzzle, and trusted places such as Akami, Fastly, and Cloudflare have the other piece. One cannot solve the puzzle without the other part, thus hiding your browsing habits. The sites you visit cannot build profiles of your activity.
If you have the latest iPhone, chances are you have iOS 15 and access to alternative VPN iPhone settings. To activate this feature:
- Open the Settings, go to the tab with your name, and select iCloud.
- Press the Private Relay option, then activate it by pressing Private Relay again.
- You can also turn it off from here.
- Select IP Address Location preferences to switch your location settings.
Reasons to Get a VPN
There’s a wise, albeit modern saying that data you generate on the internet is more valuable than you are. A VPN allows you to keep that info to yourself. However, an excellent VPN service offers much more than just security benefits for your iPhone. And changing the VPN on your iPhone to achieve this protection has never been so effortless. It opens up parts of the internet that were previously inaccessible, but that’s not all it offers:
- Hiding your digital identity – While you’re on the internet, there are countless governments, corporations, and cybercriminals who want to take a gander at your browsing activity. A VPN creates a tunnel through which all communication traveling from and towards your device is encrypted. All the data you generate is hidden.
- Protection on public WiFi networks – Anyone well versed enough in coding can hack into public WiFi connections and monitor your activity, unless you know how to turn on a VPN on your iPhone. Even a public network with a password is no obstacle, since getting these passwords is equally easy. A VPN encrypts all communication, making hackers’ efforts to pry fruitless.
- Safe intranet access – With the number of people working from home rising, many companies now use intranets. An intranet is a self-contained part of the internet that is only accessible to certain users.
- Avoiding geo-blocking measures – Whether you want to watch a show that’s blocked on Netflix in your region or access a site protected by the Great China Firewall, you’ll need to install a VPN on your iPhone. These sites use geo-blocking technology that detects your IP and determines whether it’s on the list of countries with access. If you live in a country with restricted access, you won’t be able to open these sites. With a VPN, you can select a server placed in a country with access and stroll into these sites.
The Makings of a Free VPN
Finding a solid VPN that is free doesn’t have to be a stressful experience. Most VPNs have either a free version or a trial version you can try out. However, you need to look for a couple of things before you add the VPN to your iPhone.
- The strength of encryption – Most VPN providers offer the same encryption protocols on both paid and free software versions. You should check whether the one you’re looking at uses industry-leading technology, which at present is the OpenVPN protocol.
- No-logs policy – If you value your privacy, check that the VPN provider has a no-logs policy. This policy means that the company doesn’t save records of the activity you log when using its software. And if there is any trace of your activity, it is momentarily erased from the company’s servers. You cannot find this info in free VPN configuration settings, so check the company’s site and customer support.
- Limitations – Free VPNs usually have limitations built into the software, since owning real or virtual servers is expensive. Check in the terms & conditions to see what these caps are. Some free services only last for a week before you have to pay or make a new free account. Other VPN services have a monthly bandwidth limit.
- Exposure to ads – Specific VPN providers have plenty of ads on their free version that can lead to some frustrating experiences. A few VPNs even sell your sensitive data to advertisers. You can check what the deal is by taking a look at the terms & conditions before you choose a free unlimited VPN configuration for the iPhone.
- The quality of connection – Free VPN users get access to fewer servers than paid subscription users. The fewer servers you have, the more people will use it, thus causing slow speeds for everyone. Always check how many servers you get with the free software. The more, the better.